Imagine you are part of a team working on a project to provision Infrastructure. You would want to have Centralized Place for Runs (plan and apply), would want to know who has run the plan, who has given the approval to apply the code. People can comment on various runs. Who can access and who cannot. Define policies around plan and apply. You may want to maintain history of all the Runs (plan and apply), maintain state file on a shared location with access controls in place. Well, Terraform Cloud is the answer.
All in all, Terraform, in itself, is a powerful tool when it comes to provisioning infrastructure via code. Downloading Terraform and running, and be able to connect with various providers to provision infra from our computer is great, however, Terraform Cloud brings great value when we talk about Remote Management of State, Access Control, Security, especially when it comes to collaboration with other team members to manage infrastructure.
Advantages of Terraform Cloud
- Remote State
- State File will be managed in Terraform Cloud.
- Secure
- Controls on who accesses State File
- Terraform would also version and backup State File – We can go back in time and see what did the Infra look like in the past OR if required, we can restore the past version of State File.
- Centralized Runs
- Full History of the Runs
- Terraform Ensures that Only One run happens at a time
- Plan Approvals – If User A submits a Plan to change Infra. User B has to approve it to be able for it to go through
- Plan & Apply requests goes through Terraform Cloud
How all the pieces connect
There are a lot of aspects to Terraform Cloud, however, today we would understand how some of the pieces connect, to have a basic understanding of how it works.

The above diagram shows that we would have: –
Code – Configuration files(.tf) on our computer
GitHub Repo – We would push the code from computer to GitHub
Terraform Cloud – Once the Code is there on the GitHub, it would be fetched and ready to be submitted as plan and apply.
Once applied, resources in the code will be created/destroyed.
Below screenshot shows the code in the configuration file at the top. Then we pushed it to GitHub Repo

Below screenshot shows that the configuration files are now available in GitHub Repo

Now that the configuration files are available on GitHub, lets Login to Terraform Cloud to setup our workflow

Create Organization

Create Workspace and this is where we will also create connection with GitHub, where our configuration files were placed.


Now that we have we have given permission to Terraform Cloud to connect with GitHub, below screenshot shows that I am choosing GitHub repo where configuration files are placed.


Now we will be finalizing the workspace creation

We will now be creating Variables.


Terraform Cloud would now have the configuration files (fetched from GitHub) to run, however, to execute the code successfully, it would need the Access Key and Secret Access Key. I did not put this information in the provider.tf. I have planned to create Environment Variables within Terraform Cloud and input this information. However, to know what are the exact Environment Variables I need, I would have to go to Terraform Documentation, as shown below

Now that we know the Environment Variables that we need to create, lets create them on Terraform Cloud

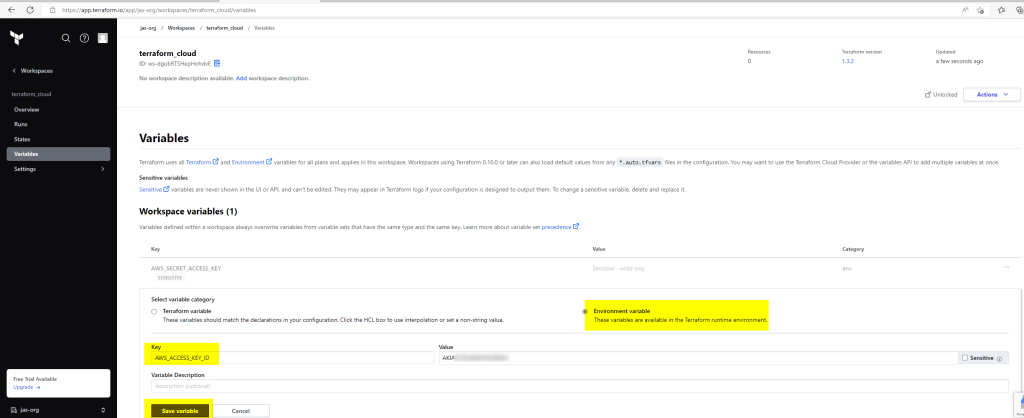
Note: If you look at the above screenshot closely, you would see that we also have an option to create Terraform Variables, if required. In case, you need to include variables in a separate file along with the configuration files in GitHub, then the file name which carries the Variable Information should be named as *.auto.tfvars
We can see below that we have successfully create Environment Variables, required to connect to AWS to create resource. I have not included ‘Region’ because my provider file already has the ‘Region’ information.

At this stage, we have authorized Terraform Cloud to connect with GitHub Repo and fetch the configuration files and we have also provided Access Keys to connect to AWS to be able to create resource mentioned in the configuration files.
We will now Start the run for terraform plan and terraform apply


If we closely look at the options available in the type of Run. Interesting! Isn’t it
Plan and Apply – This would run both terraform plan and terraform apply
Refresh State – This option would mean that terraform would check the current/actual state of resources managed by Terraform and if they do not match with the desired state, then it would update the current state of those resources in the Terraform State File. However, to be able to use this option, Terraform version should be greater than or equal to 0.15.4
Plan only – This would just run terraform plan
Allow Empty Apply – A no-operation (empty) apply enables Terraform Cloud to apply a run from a plan that contains no infrastructure changes. During apply, Terraform can upgrade the state version if required. You can use this option to upgrade the state in your Terraform Cloud workspace to a new Terraform version.


Let’s Destroy the resource created via Terraform Cloud


Note: If you make any change in the code (in configuration files) or you create another configuration file, that change would be fetched within Terraform Cloud and your Run status would change from ‘Applied’ status to ‘Planned Status’.
Important Links: Run Modes and Options – Runs – Terraform Cloud | Terraform by HashiCorp
Hope you enjoyed learning today.